


Today, I’m excited to share with you my master bathroom retreat. No it’s not been recently refreshed or decked out with anything new, but I wanted to discuss the choices we made when building out this space. Over the past few years, I have continually gotten a lot of questions about this master bath design, and I thought I’d answer them below.
When we built our home, I wasn’t too particular about the size of my bathroom. Many of you may be thinking you’d love a large bathroom, and I understand that too. I always base my design off of what I know first, and I had a few things in mind before building. I knew I wanted my own sink area, and I knew I wanted room for a clawfoot tub. Those were my bathroom must-haves when we built. Richard, my husband, asked for only two things in our entire build. One pertaining to the bathroom. He wanted a big enough shower to have two shower heads and an overhead rain fall shower head. Let’s just say he got his wish.
After we designed our home, our architect showed me what room we had square footage wise to incorporate a master bath and because the master bath wasn’t a huge priority for me, it didn’t have to meet a certain square footage perimeter. I was happy with the space as long as it had the few key elements we hoped for.

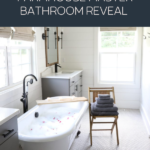
The area for our master bath ended up being long and narrow. I think of it like a galley kitchen but a galley bathroom. We placed our tub in the center, as the focal point under the windows, and even went risky and didn’t include a door to the bathroom. The bathroom just opens with an 9 foot cased entry into the master bedroom. I know many may not prefer that, but it’s worked fine for us, and I simply lock the bedroom door when I’m needing a soak. We also used shiplap in this space, and and if you look close you can see the curvature in the ceilings too. Fun Fact: that curvature is there because our roof lines curve out along the edges too.
Now about that tub. This isn’t an old tub believe it or not. It’s a made new design based off a reproduction. I highly recommend Vintage Tub if you are in the market for a new tub. They have all design styles and variations of multiple bathroom products and you can get cast iron or acrylic options too. We even have a more modern` tub from this company in our cabin rental too. They are affordable and deliver with ease. I will tell you my mistake. I ordered the cast iron because I didn’t know acrylic would look just the same. Needless to say, it took 8 men to get it in the house. My mom has the same tube in the acrylic version and its held up fine and was so light and easy to manage! Moral of the story, consider acrylic or cast iron before purchasing. Here is the tub we went with in the 64″ length.

Next, we added simple cabinet vanities with feet to make them look more like a furniture piece. I never knew you could do that until building and learned from an IG friend that you can have the backsplash to your vanities beveled and rounded out to look custom too. I was so glad I did this. Here is a picture of them. You can see the curvature of the 8 inch quartz countertop backsplash. It creates a more custom look.

Our cabinets are in the color flint and came this way from our cabinet company. They also match the kitchen island. I will say, I have loved the gray but it does make the master tricky to decorate. I feel the need to include that gray into every color choice for the bedroom. Now looking back, I wish I had gone more neutral and have even recently thought of painting them. Don’t quote me on it, or tell Richard. For now they work, and if you are looking for a smilier color to Flint, Gauntlet Grey by Sherwin Williams is the paint match to it. I had to match it for the mudroom cabinets.

Next, let’s talk tile. I always have such a hard time with tile in home design. In our rentals, we have purchased waterproof laminate and use that in most all bathrooms now. Why? Because tile is hard to keep clean and the grout always needs work. It’s also hard for me to simply pick out something in combination with other tiles for the shower.

For this bathroom, I went with classic penny tile. At this point in my design journey, I wanted something to mimic the farmhouse antique vibe of the home. I love the black and white penny tile patterns in early 1900’s homes and so we went with the white penny tile. It’s affordable too. I’m linking here the multiple choices of penny tile for you to see how many there are. We purchased from Floor and Decor. I also swore I’d never do light grout in any bathroom, so we went with a taupe colored grout. That was NOT a mistake. Don’t go with light grout! Even tinting it slightly will help you greatly in the long run.
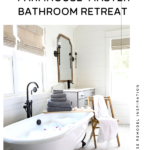
Let’s talk lighting and mirrors. I’ve changed both here and there over the past few years and have listed a similar chandelier for you (because it’s long since out of stock) and the ones I have around the vanity are listed below as well. Click photo for source links.


Now, onto the shower! Which, I truly don’t have a picture of and you will read why. But don’t worry, it’s the size Richard wanted. The size is perfect. It is the tile choice I don’t care for and the craftsmanship.
I carried the same penny tile that is on the floor of the bathroom into the shower. That part I don’t regret. Continue on into the shower so its one continual look. What I am not a fan of in bathrooms are multiple colored tiles and patterns all over the place. It simply gets too busy, and that’s why I hate picking them out. It is also why I carried the same floor thats on the the bathroom into the shower floor so it looks like one continual floor. I also get asked a lot if it’s slippery. I have never found it that way unless my boys spill loads of water and bubble bath everywhere. We just keep rugs near the shower and have never had an issue.
The tile on the shower walls is a small white hexagon tile seen here.

I wish now I had done something more simple. The small hexagons were not put on properly and there are some unfinished fragments and discoloration in the grout. It’s not unattractive by any means but I think now I would have done larger tile for the walls. Again, I am just not a fan of tile. I think the more pattern and business you get, the more you are distracted from the beauty in the aesthetics of the space.

Speaking of aesthetics, now that you have read about the main building elements we used to dress up this bathroom, let’s talk about aesthetics. I love dressing up my bathroom for my guests or simply for me especially with bubbles, candles, and new towels. Recently, I was lucky enough to partner with Micro Cotton. After 14 years of marriage with the same ole towels, treating myself with these Dillard’s Noble Excellence Elite Bath Towels have changed my ways. My entire family loves them. These towels are so absorbent and soft. They’re made with superior extra-fine, long-staple cotton for long lasting strength and softness to create a luxe bath experience. They come in multiple colors and are available here. Add some bubbles, candlelight, and music and you have the perfect evening to yourself. Rare for me but a treat!

Now that you’ve heard about our master bath design and the finishes in our bathroom, leave your questions and comments below.
Comments will load here